Posts

Showing posts from January, 2021

Distress Technique

Image
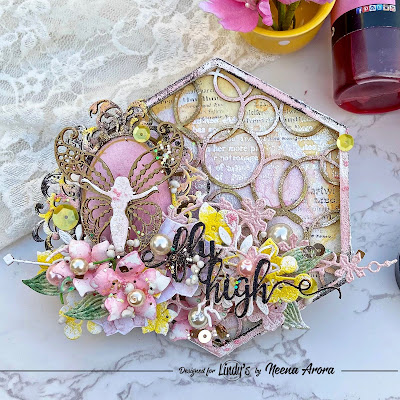
Hello, Lindy's Fan! Today you are with Neena Arora. I am here to present little inspiration with Embossing powders which I will use as a notice board magnet for my daughter's room that would keep motivating her to reach for her dreams.  Here, I would love to show you how gorgeous any project turns using EPs at maximum.  I have used the distress technique with  Embossing powder. I would  also love to show how to use three to four EPs together on one element to get the shaded effect.   Basic process Prime the base with white gesso. Add script Stamp randomly with versa clear ink and with Purely White Embossing powder. Again add a text Stamp randomly with black Archival ink.   Add some colour with Pink ladies Pink, and California poppy gold. Next, heat emboss the background chipboard using Chateau Rose, Gimme Five Gold, Oakleaf Olive and Purely White EPs sprinkled randomly. Similarly, heat emboss chipboard frames using yodelling yellow, chateau rose and purely white EPs. Now the

Beauty

Image
 Hello! Today, I am on Fantasy blog with a simple yet beautiful layout using chipboards and die cuts. These days I am giving virtual classes and this one I recently taught. S o,  This is to inspire those who are beginners and love to use fantasy products.  This time I chose to go with the lightly decorated layout so that it is easy to understand. This is 12 x12 layout created on theme Beauty. I  tried to give it a glam feel. I  used Mintay papers from the fantasy store. I have made flowers using hydrangea die. heat embossing chipboards and die cuts is always my favorite. this time I used 2tones embossing technique. I have applied texture through the script stencil. after building the composition I added microbeads, sequins and glitters to beautify the layout. L et's have a closer look at the photos how gorgeous chipboards and die-cuts look: Fantasy products I have used New Year's pattern 2 "Whirlpool of flowers" Hydrangea  "Mannequin 793" "Beaut

Altered Alphabet

Image
 Hello crafters, A very happy new year to all of you. Today I am sharing my first project designed for Little Birdie. let me share the inspiration behind this project. My daughter is my world and she loves pinks and mauves. S he wants me to create projects only for her that too in pink color. S o I keep on adding my craft projects to her room. T his time I decided to alter a paper mache letter "k" for her room. I have used birds and berries collection and other products from the Little Birdie online store. Basic steps Trace the letter "k" on the pattern paper and cut it out Cover the alphabet with white gesso. Apply the crackle paste on the sides and make it dries using a heat gun. Again apply the crackle paste through the stencil. Now paint it using chalk paint using wash technique. Next, paste the cutout of the letter "K"  Now start building the composition using the fussy cuts, embellishments, sticker and flowers. To add a fun stamp around the composi